
4 Essential Audio Effects for Podcast Editing in 2026
- Adam Mills

- Apr 3
- 4 min read
What are the 4 essential audio effects for podcasting?
Whether you use a DAW (Logic Pro, Reaper) or do this in your video editor (Final Cut Pro, Premiere Pro) you can get better sounding audio than the auto voice clean-up features found in most video editors (Capcut).
There are really only four effects you need to make your podcast sound professional.
Here's a look at each one. The order matters, so add them in the sequence below.

Key Takeaways (TLDR):
Order Matters: Always apply effects in the sequence of Noise Reduction → EQ → Compression → Limiter.
Tools: Use specialized tools like iZotope RX for cleaner results than built-in video editor "auto-clean."
The Goal: Consistency and clarity without making the voice sound "processed" or "dead."
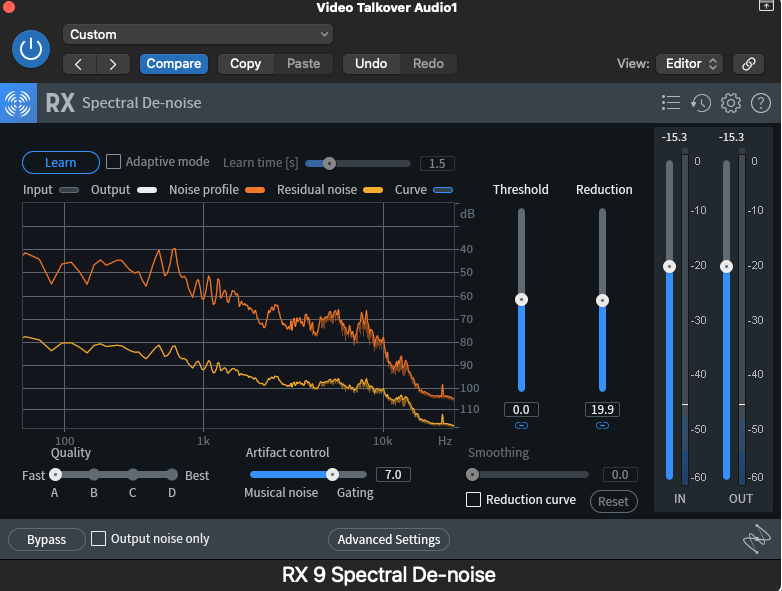
1. Noise Reduction: Cleaning the Signal
The first step is cleaning up your recording using a noise reduction tool. I use iZotope RX (currently on version 11, though I still use RX9, which works great).
There are two ways to use it. My preferred method is to let RX listen to a section of dead air - just the microphone with no dialogue, usually at the start or end of the recording.
Hit Learn, and the tool builds a noise profile, it then removes that noise from the signal, leaving you with a clean, clear voice. You can choose how much reduction to apply. Too much and the voice sounds dead and lifeless. Too little and you'll still hear hum and background noise. Sweeten to taste.
You can also run it in automatic mode, where it reacts in real time, but I find the results are better when it's analysing a static noise profile.
Why first? Cleaning up before you enhance means the later effects aren't also boosting your noise floor.
2. EQ (Equalization): Shaping the Voice
EQ works like the bass, mid and treble controls on a stereo - it lets you boost or cut specific frequency ranges to shape the sound of a voice.
Some common podcast EQ balance adjustments are:
Audio Issue | EQ Solution |
Boomy Voice | Roll off low-end (bass) frequencies. |
Sibilance/Hiss | Reduce high-frequency bands. |
Muffled Dialogue | Gentle boost in the mids (2-4kHz). |
Pro tip: The human ear is particularly sensitive between 2-4kHz. A gentle boost around 3kHz can add real clarity and presence to a voice. Just don't overdo it as too much in this range sounds harsh and fatiguing to listen to.

EQ shows a 3db boost at 3Khz to enhance vocal clarity and a low cut filter set at 50Hz to remove unwanted rumble.
3. Compression: Balancing Dynamics
Compression is one of those tools that confuses a lot of people, but the concept is straightforward: it evens out a dynamic audio signal. If a voice jumps between loud and quiet, which voices naturally do, a compressor brings the loud parts down so you can raise the overall level, making the quiet parts louder.
In short: compression raises the average volume and tames the peaks, giving you a more consistent signal.
The main controls to know:
Threshold — the level at which compression starts to kick in
Ratio — how aggressively it compresses above that threshold
Attack — how quickly the compressor responds
Release — how quickly it lets go
Makeup Gain — brings the overall level back up after the peaks have been tamed
It takes a bit of practice to hear what compression is doing, but even a subtle amount makes speech easier and more enjoyable to listen to.

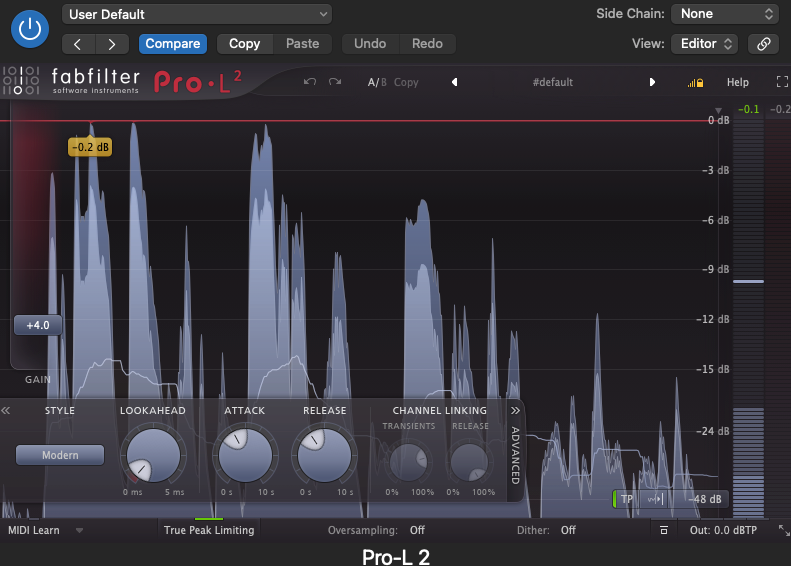
4. Limiter: The Safety Net
A limiter is essentially an extreme form of compression. Think of it as a compressor with a very high ratio that won't let anything pass a set threshold. Hence why it's sometimes called a brickwall limiter.
You set the threshold just below 0dB (for context: 0dB is the maximum level digital audio can reach before it starts to distort). Setting it at around -1dB means nothing in your podcast will clip, and you avoid that harsh, crackling distortion that everyone hates.
Think of the limiter as your safety net, it catches anything the earlier effects might have pushed too loud.
The limiter always goes last in your effects chain, because other effects can push gain (volume) upward, and you want the limiter catching all of that at the final stage.
Bonus: Reverb (Or Rather, De-Reverb)
For podcasting, you almost certainly don't want to add reverb. Your recording space has likely already introduced some natural room sound into the recording. Adding more will make the voice sound too distant and unprofessional.
What you might need instead is to remove some. A de-reverb effect, a gate, or an enveloper can help tighten things up. I use and recommend iZotope RX's De-Reverb for this. Go carefully here - too much de-reverb leaves a voice sounding unnatural and lifeless.
Final Thoughts on Podcast Editing Audio Effects
These four effects; noise reduction, EQ, compression and limiting are at the core of professional-sounding podcast audio. You won't always need all of them, and there are plenty of other tools out there, but these are the ones I come back to consistently, whether I'm working on a podcast, dialogue, or music production vocals.
If you'd like someone to handle your podcast editing for you, get in touch with me here: adam@ammusic.co.uk or for more information click here.


On examination, the claims are measured and supported by data. The evidentiary standard applied here is consistently high. The website offers additional thematic background for the discussion. Activity patterns are benchmarked against digital platform norms.